Last update: $Id: backup-server.md,v 1.7 2026/01/31 14:01:53 cvs Exp $
The following article describes my server backup concept and its implementation. I have a couple of servers and all of them backup themselves nightly on at least one remote destination, sometimes multiple. I don't want to go into the details of the why I have backups, if you ever lost some data you know why. For everyone else, there is the tao of backup.
All my servers run on OpenBSD, however, the following concept and the script is so generic you can easily use it Linux, FreeBSD, NetBSD, or whatever your Unix-like distribution of choice is.
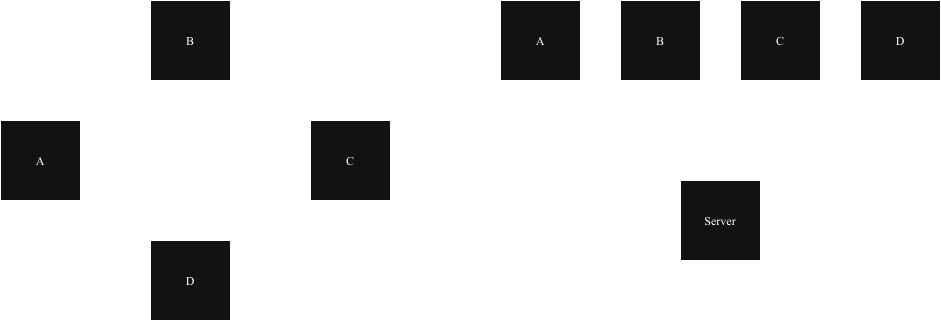
As show in the following picture all servers A, B, C, and D either backup themselves onto another server (left hand side), or onto a remote server (right hand side).
I use both strategies since one backup is no backup. Remember the tao of backup mentioned above. Further, none of the servers uses extraordinary amounts of data which wouldn't fit on one of the others.
The backup is performed over SSH and each server has two dedicated SSH key pairs:
Since the private keys are used by scripts, they must not be password protected. The public keys are copied onto the target server and restricted to connections from the respective source IP addresses. The restrict keyword disables port, agent and X11 forwarding, as well as the execution of ~/.ssh/rc for successful connections. See sshd's man page for all options to apply to a certain public key. Note: Spaces are not allowed between the arguments!
target $ cat .ssh/autorized_keys
restrict,pty,from="XXX.XXX.XXX.XXX,YYYY:YYYY::YYYY" ssh-ed25519 AAA[...]
Furthermore, the keys are deployed for a dedicated user so that even in the event of a private key compromise, the attacker access is limited to an unprivileged user. To be able to make use of the above mentioned private SSH key, the attacker must be root on the source server. Since they can then access all files on the server anyway, the risk of seeing a copy of the data on the backup server is deemed acceptable.
On the source host the private key is owned by root and has a file mode of 0600. Since we will use the SSH key pair also for en- and decryption of the backup, make sure that you have a copy of the SSH keys pairs locally.
For simplicity, I don't perform incremental backup, just full backups. To avoid that the backup's size fills up the disk of the target server, I roll over the backup after a number of backups. I roll over after 5 backup, you should adjust that number something that fits both your desire for disaster recovery and your personal risk appetite. You can of course also adjust the number of backups in relationship to the expected backup size, i.e. the smaller the expected size, the more backups you keep. Whatever you do, I recommend to have at least two backups.
In case, space and time are not at issue for you, go with all. However, keep in mind that the larger the backup is, the longer a restore will take.
Now that you have an idea about the architecture, it is time to actually configure the backup.
At first, generate a dedicated SSH key. As mentioned above, don't enter a passphrase for the new key. Since the backup job runs as root, perform all the following steps as user root.
root@source # cd /root
root@source # mkdir tar-backup
root@source # ssh-keygen -t ed25519 -f backup-key-source
Now copy the SSH public key (backup-key-source.pub in my example) to the target system and append it into the authorized_keys file of the unprivileged target user. In this example, the user is called backup.
backup@target $ cat backup-key-source.pub >> $HOME/.ssh/authorized_keys
Now open the authorized_keys file in an editor and put the following information before the key in the same line. Replace the XXX and YYYY placeholders with the IPv4 and IPv6 address of the source. This ensures that the key's usage is restricted and can only be used when the connection originates from the noted IP addresses.
backup@target $ cat $HOME/.ssh/autorized_keys
restrict,pty,from="XXX.XXX.XXX.XXX,YYYY:YYYY::YYYY" ssh-ed25519 AAA[...]
Now verify on the source server that you can actually log into the target system. Use SSH's -i option to ensure that only the recently generated key is used.
root@source # ssh -i backup-key-source backup@target
[...]
In case you want to backup to a second target server, repeat the steps above. It's up to you if you want to want use the same key or generate a new one.
In the next steps, the script for the backup will be installed and configured.
Change into the /root/tar-backup directory and install the backup script. I will walk you through the script. The header of the script consists of variables you can modify, such as the FQDN of the backup server, SSH port, and local file path. Only change the other variables if you know what you're doing. If you break it, you get to keep the pieces.
root@source # cd /root/tar-backup
root@source # head backup.sh
#!/bin/sh

[...]

# FQDN and user name for your target backup host
THOST=backup@target.invalid
# SSH port of the target
TPORT=22
# Path for backups on the target host
TPATH="/home/backup"
# Directory where the script is located
LSCRIPTPATH="/root/tar-backup"
# Local path to the private SSH key
TKEY="${LSCRIPTPATH}/backup-key-source"
The script uses tar(1) to perform a full backup minus the files you want to exclude. By default, that's nothing. If you perform a ring backup, you must at least exclude the backup itself unless you want to backup data over and over again. Create a filed called exclude-file in the same directory as the script and add one line per path (file or directory) you want to exclude from the backup.
Here is a copy of my exclude file (tailored towards OpenBSD):
root@source # cat exclude-file
^/bin/
^/bsd
^/bsd.rd
^/dev/
^/etc/spwd.db
^/home/backup/
^/sbin/
^/tmp/
^/usr/X11R6/
^/usr/include/
^/usr/lib/
^/usr/local/lib/
^/usr/local/share/
^/usr/ports/
^/usr/src/
^/usr/share/relink/
^/var/cache/
^/var/log/
^/var/run/
^/var/www/run/
Although I backup my data on my own servers, I prefer them to be encrypted. I use age for this job since it's just one binary, needs no additional dependencies and supports encryption with a SSH key pair. And since we're just generated a SSH key pair, we're ready to go. Use the package manager of your distribution to install it, on OpenBSD it works as follows:
# pkg_add age
Once you have configured the variables and defined the exclude file you can run the backup script and it should work. Depending on certain factors (number of files, size, network throughput, disk I/O) this can take some time.
root@source # chmod +x backup.sh
root@source # ./tar-backup.sh
[+] Start backup process, Level 1: Sun Jan 25 18:32:59 UTC 2026
[+] Created list of files to backup
[+] List successfully pruned
tar: Removing leading / from absolute path names in the archive
[+] Successfully backed / up
[+] Create index
[+] Restricted file permissions
[+] Increase backup cycle number
[+] Backup done: Sun Jan 25 18:39:21 UTC 2026
Once the script is done you will see a file named root-HOSTNAME-NUMBER.tar.gz.age on the target system. HOSTNAME is hereby the host name of the source system and NUMBER the number of the backup.
In case you need to restore the backup, you need to decrypt it first. This can be done with age and the source server's secret SSH key.
$ file root-HOSTNAME-NUMBER.tar.gz.age
data
$ age -d -i /root/tar-backup/backup-key-source root-HOSTNAME-NUMBER.tar.gz.age > root-HOSTNAME-NUMBER.tar.gz
$ file root-HOSTNAME-NUMBER.tar.gz
root-HOSTNAME-NUMBER.tar.gz: gzip compressed data, from Unix
Once the backup script is working as expected, you want to configure it so that it runs at defined intervals. I prefer to run all backup jobs during night times since I seldom access my servers at night. YMMV. Using OpenBSD, I have the following line in root's crontab.
~ 2 * * * -s -n /root/tar-backup/tar-backup.sh && ftp -o /dev/null -M -V https://hc-ping.com/XXXXX-XXXXX-XXXXX-XXXX
This instructs cron to run the backup script between 02:00 and 02:59 at night. The ~ is a speciality of OpenBSD's cron and means to choose a random value that matches the limits of the current field, minutes in this case. In case you use another operating system, chose whatever way your periodic scheduler offers to run a job with a random time offset. All jobs at my different servers run at different times so that they don't interrupt each other.
Since the script is run from cron or some other scheduler, the environment of the script might be different from the one of your local shell. The script comes with its own PATH variable. In case the script does not work at all or doesn't run properly, check that all called binaries are in the PATH or modify the latter accordingly.
If you ask yourself what the ftp command does, it connects to healthchecks.io. A very nice service which basically offers a cronjob monitoring. Once my job is complete, it calls an URL connected to my account and registers the job as completed. Or failed, if things go south. You can choose between daily email digest, signal messages, or plenty of other notification options. They have a free tier, but also inexpensive priced tiers which support the project financially.